For users to have access to TourplanNX, they must have a unique user login and password created within Security Setup. Information such as user contact details are stored here and can be used to output on your documentation or messages. User specific INI settings can also be created, streamlining these processes for user setup.
NOTE: Each Tourplan NX system is licensed for a maximum number of concurrent users being able to access the system. This does not mean that the maximum number of user names that can be set up is the same as the number of concurrent users the system is licensed for. As many user names as required can be set up; the limit is how many of those users are logged into Tourplan NX at any particular time.
Create a User
-
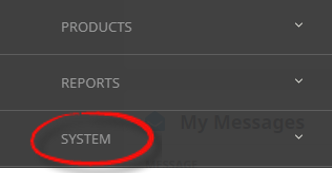
From the Home menu, select
 Home > System > Security Setup.
- Click the Home menu to expand it:

- Click the System menu option to expand it:

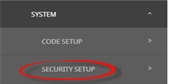
- Click Security Setup to go to the Security Setup menu:

- Click the Home menu to expand it:
-
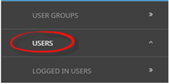
From the Security Setup menu, selectUsers.
- Click Users to open the Users screen:

- Click Users to open the Users screen:
-
On theUsers screen, if the User that you want is not already in the list, click Insert.

-
On the blank User Profile screen within theDetails tab, enter a Login Name, Full Name, Password and Password Repeat. Complete the available contact fields.

-
If you are using Security levels orUser Groups, insert the required Security Level and select the User Group.
NOTE: User Groups and Security Levels do not have to be defined.
-
Open theSettings tab, click Insert.

-
On theCreate User INI screen, select the required Module, and Setting Name from the dropdown fields. Enter values or select required options in the additional fields that display.

-
ClickOK to keep the changes and save or update the entry.

-
ClickSave to keep the changes.

-
ClickExit to discard any changes.


About User Fields - Details Tab
![]()
Login Name
This is the name that the user logs on to Tourplan with. The Login Name field will allow up to 30 characters.
NOTE: This field is forced Caps.
Deleted
This check box indicates that the users name will no longer appear in dropdown selections.
Full Name
The user’s full name (forename and surname) can be entered in this field. The maximum number of characters this field will allow is 100. Remember that the users name can output onto your documentation so formatting of this field should be considered.
Booking Consultant
If the consultant record has already been created in the Code Setup > Bookings > Consultant, and if the new user is going to create bookings (PCM, FITs and/or Groups), select the appropriate booking consultant record from the dropdown. If the consultant record has not yet been created, refer to Creating Consultants.
Initials
Enter the Initials required for the New user.
Job Title
The user’s job title can be entered in this field. This field will allow up to 100 characters.
There is a case for entering the user's forename in the Full Name field (not in caps as per the login name), and the user's Surname in the Job Title field if this is not going to be used for the Job Title. The rationale being that on some messages/documentation, the Forename only is output and on others, the Forename and Surname are required.
User Group
If Groups have already been created in the Security Setup > User Groups application, select the applicable group name from the drop-down. If groups have not been set up, leave this field blank. If User Groups have not yet been defined, refer to Creating User Groups.
Security Level
Enter the numeric security level value for the user (if required). This can be a value between 0 and 99. Each item on Tourplan NX's menus (and the menu nodes within each application) can have a security level number assigned to them which then determines the individual user’s rights to access that particular menu item. Further details on the setting of system/menu security levels, is detailed in the Security Introduction of this User Manual.
Password/Password Repeat
Enter the user's password. This is the password that the user logs on to Tourplan with.
Password Expires
This will always default to today’s date. You can set the date right out until 31 Dec 2050 or if your organisation's policies are to enforce passwords to change regularly, you can select a date not as far forward in the future.
If the password has expired the user will be prompted to insert their old password and create a new password when they log in.
Enter the user's email address in this field. This is used as the From email address when outputting messages to email. This field will allow up to 100 characters.
Phone
Enter the user's phone number. This is information only and can be output on documentation. This field will allow up to 100 characters.
Mobile
Enter the user’s mobile number. This is information only and can be output on documentation. This field will allow up to 100 characters.
Fax
Enter the user's fax number. This is information only and can be output on documentation. This field will allow up to 100 characters.
NOTE: Some thought needs to be considered with regard to the consistency of your phone/mobile/fax fields. For example, will you use + in place of 00, and the spacing between or the use of brackets for area codes. Consistent entry of these fields will make your documentation consistent.
Web
Enter the user's web URL. This is information only and can be output on documentation. This field will allow up to 250 characters.
About Settings Tab
Any settings already defined will default into the Settings tab table. On clicking Insert the Create User INI screen will display, allowing you to insert or view user specific INI Settings.
NOTE: Clicking the Show All Settings check box will display a list of ALL the INI Settings currently assigned to the user within the system. Which is helpful to identify what INI Settings permissions could or should be added to the user at this point.
Module
The INI Settings application the setting applies to.
Setting Name
The Setting Name chosen from the list of INI Settings available within the Module.
Value
The set Value.
NOTE: Depending on the Setting Name chosen, value types may include dropdown options, Y/N selections, and entered data.
Description
A hard coded description for the Setting Name. This description will default when the Setting Name is selected.
User ID
The users User ID. This is a combination of the Login Name and Full Name details.
Creating a Consultant
Once a user has been provided a log in and password the next step in the setup process is to assess if the user will require consultant access to applications within Tourplan.
For system setup of multiple consultants we advise creating linked consultants from a systemwide setup -Please see additional procedures on creating Consultants.